Pumpkin Peanut Butter

Have you had enough of pumpkin yet?

We certainly hope not, because we have one last recipe to add to the onslaught of pumpkin-themed-everything that you have probably been being hit with for the past month-and-a-half.  If you are tired of it though, perhaps we could change your mind… with a cookie?

DSCN6421

Oh sorry, that’s just the dough- you were expecting the baked stuff, weren’t you?

DSCN6425

*Disclaimer: there may or may not have been a certain amount of dough that did not quite make it into cookies…

DSCN6427

But isn’t it kind of a rule that you always have to taste-test the batter before you bake the cookie?  It is in our house, anyways 😉

DSCN6429

In all seriousness though- these cookies are fantastic.  Who knew that peanut butter and pumpkin could be such a winning combination?  Of course, the chocolate chips just add that extra bit of decadence 🙂

DSCN6431

It’s difficult to describe the texture of these cookies.  They’re soft but dense, sort of cake-like but not quite as light as cake- you know what? Maybe you guys should just try them and decide for yourselves what the texture is instead of letting us ramble on forever, sound like a plan?

DSCN6433

And after all that we completely forgot to mention that these are gluten free!  How silly of us!  We used our trusty‘ol new gluten-free flour blend, of course :).

If you think the peanut butter-pumkin combo is strange, we urge you to give it a shot- we think you’ll be pleasantly surprised.  We know we were!

And after you’ve made these cookies, we give you full permission to start into all things ginger bread, peppermint, cranberry, chocolate and Christmas-filled wonderfulness!

Gluten-Free Peanut Butter Pumpkin Chocolate Chip Cookies

DSCN6431

Prep Time: 10 minutes
Bake Time: 15-20 minutes
Makes: 12 cookies

Ingredients:

2 c. Gluten-Free flour blend
1
/4 tsp xantham gum
1 tsp baking soda
1/2 tsp salt
1/2 tsp cinnamon
2 eggs
1/2 c. pumpkin puree (not pumpkin pie filling)
1/2 c. peanut butter
1/2 c. liquid honey
1 tsp vanilla extract
1/4 c. – 1/2 c. chocolate chips

Directions:

Preheat the oven to 350F

Combine the flour, xantham gum, baking powder salt and cinnamon in a medium-sized bowl.
In a separate smaller bowl, combine the remaining ingredients except the chocolate chips.
Add the wet ingredients to the dry ingredients and stir just to combine.  Stir in the chocolate chips.
Cover a baking sheet with parchement paper and spray with non-stick cooking spray.  Drop the dough onto the sheet, about 2 tbsp for each cookie.
Using a floured fork, press the cookie so that it’s flat, shaping them to make them round.
Bake for 15-20 minutes, or until they are firm enough to be picked up and the bottoms are slightly brown.

~twosaucysisters

What was your favourite pumpkin recipe from this Fall?  Are you looking forward to Christmas baking?  What are you planning to make?

All Dressed Up

Even though it’s starting to get a little colder (you have no idea how much it pains us to admit that!) we here at Two Saucy Sisters still believe that it is never too cold for a big ol’ salad!

That being said, there are definitely a lot of ways to change up a salad to make it more seasonable.  Adding cooked, cubed sweet potato or squash adds a nice Fall flair, as do some crisp apple slices.  Pair that with some toasty walnuts and creamy goat cheese and you’ve got yourself a pretty tasty fall-ified salad!

But of course, salad just isn’t salad without dressing, now is it?  You could just go with your usual oil-and-vinegar combo, but why not make it a little more special?

DSCN6402

Something you may not know about us is that the house we live in (when we’re not at school) is actually a more than 100-year-old fruit farm.  Most of the orchards are gone now and we only have about 3 acres of the original land left, but we do have a few pear trees that still produce fruit every year.  So, you can imagine that when our gracious father picked us a whole bunch of them, we needed to figure out a way to use them up before they got too ripe.  Who knew the answer would be salad dressing?

DSCN6404

Yup- we made a pear vinaigrette!  It’s a little sweet, it’s a little savoury, and it makes the perfect topping for a Fall-inspired salad!

DSCN6408

This works really well if you just so happen to have a couple slightly over-ripe pears in your fridge.  If you don’t, just leave a pear out on the counter for a day or two and you’ll be ready to make this tasty dressing.  It’s simply a matter of throwing the ingredients in a blender and you’ve got yourself enough dressing for several salads in mere minutes!

DSCN6401

So now you have no excuse not to eat your greens 😉

Happy Fall Salad-Eating!

Pear Vinaigrette

DSCN6402

Prep time: 5 minutes
Makes: ~1 cup

Ingredients:

1 ripe pear
2 tbsp apple cider vinegar
2 tbsp white vinegar
dash of salt
pepper, to taste
1/2 c. olive oil

Directions:

Add all ingredients to a blender except for the olive oil, and blend until the pear has been pulverized.   With the motor running, slowly add the olive oil in a steady stream.  Blend for another minute or two to ensure the pear is fully blended and everything is combined.  Adjust seasonings to taste.

Store in a sealed jar in the refrigerator. (Just be sure to set it on the counter a few minutes before using it, and give it a stir before pouring)

~twosaucysisters

Do you ever make fun salad dressings?  What’s your favourite way to jazz-up a salad?

Easy Mexican Meals for Busy Days – Guest Post

So we’re basically the laziest bloggers ever! After not posting for more than a month, what’s one of the first things we do? Put up a guest post! But Allison has been waiting patiently for so long now, we just had to post one! We really like the topic, too, because really, who doesn’t like Mexican food? We’re sure your family will love her recipes too! Take it away, Allison!

————————————————–

I love Mexican food. Tex-Mex really. Since I am a native Texan it only makes sense that I

would love those flavors. However it is not just the taste of Mexican food that I love. I also love

it because it is so easy and quick to put together. Not only that but Mexican food is infinitely

customizable. From vegetarian versions to kid friendly meal ideas, Mexican food is great for any

occasion. Here are a few easy Mexican meals you can make in a snap:
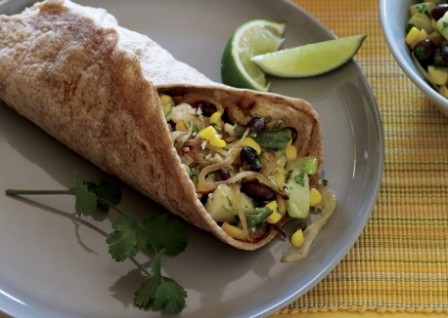
Image

Tacos

Tacos are a family get-together favorite because they are so adaptable. No matter what taste you

have or what veggies you like you can be sure to load up a taco that is to your liking. Kids love

to use just the basic meat, cheese, lettuce and tomato combo but you can spice it up with salsa,

add some smooth guacamole and more. Here is a basic recipe that your family is sure to love:

Ingredients:

10 Small Corn Tortillas (Taco Shells) Soft or Hard

1 lb.Ground Beef (or Turkey or Refried Beans or Ground Chickpeas)

1 pkg.Taco Seasoning or 2 tbsp. Flour(Optional)

2 cups Shredded Cheese

1 jar Salsa (or Pico de Gallo)

1 cup Diced Tomatoes

2 cups Shredded Lettuce

½ cup Sliced Mushrooms

¼ cup Sliced Ripe (Black) Olives

1 cup Diced Onion

¼ cup Diced Green Bell Pepper

½ cup Sour Cream

½ cup Guacamole (or Avocado Slices)

Directions:

Tacos are easy because they are so versatile. You can assemble them ahead of time or allow

everyone to create their own. First you start with the meat. Ground chuck has the best flavor for

tacos. If you do not wish to use meat you can also use refried beans or ground chickpeas. Brown

the meat and pour off the grease. For a strong Mexican flavor add taco seasoning. For a less

spicy flavor add the flour. Make sure the flour is stirred into the meat well before serving. You

can also do without either. Next you need to prepare the shells. Crunchy shells can be purchased

next to the salsa in the international aisle. They need to be baked until crispy. Soft shells can be

purchased near the bread and must be fried before serving. Using a non-stick skillet spray the

pan with oil and cook each side until lightly brown. Shells will start to bubble when cooked. Let

everyone assemble their own flavor combinations. Or if you want to you can pre-make the tacos

by taking the uncooked crunchy shells, filling them with meat and cheese, and then baking ,

closely packed, in a casserole dish.

Image

Burritos

I love the chunky, crispy goodness of a burrito. A great meal to eat on the go it is also a tasty

dinner treat that you can whip up in no time flat. Although this recipe is able to feed up to ten

people, you can cut down the ingredients and just make one or two. You can even turn it into a

fun party meal by letting everyone make up their own and then baking them all together.

Ingredients:

10 Large Flour Tortillas

1 can Refried Beans or Ground Chickpeas

2 cups Spanish Rice

1 lb. Ground Beef (or Ground Turkey or Shredded Chicken)

1 pkg. Taco Seasoning or 2 tbsp. Flour (Optional)

2 cups Shredded Cheese

1 can Whole Kernel Corn (Drained Well)

½ cup Roughly Chopped Tomatoes

½ cup Roughly Chopped Mushrooms

¼ cup Whole Ripe (Black) Olives

1 cup Roughly Chopped Onion

¼ cup Roughly Chopped Green Bell Pepper

½ cup Sour Cream

½ cup Guacamole (or Avocado Slices)

1 jar Salsa (or Pico de Gallo)

2 cups Shredded Lettuce

Directions:

Burritos are both similar and different than tacos. First of all, after you cook the meat (following

the directions for the taco meat) you do not cook the shells. Flour tortillas for burritos are larger

than taco shells, about the size of a large dinner plate. Burritos are cooked fully assembled.

Preheat your oven to 375 degrees. Take the flour shell and start in the middle. Make sure you

leave room on the ends and sides. Do not overfill. Spread the bean paste first and then top with

meat and rice. Sprinkle on a thin layer of cheese and add the vegetables, excluding the lettuce.

The veggies should be rather large so that they will not get too soft in the baking process. Wrap

the burritos by folding in the top and bottom first and then wrapping the sides. Hold closed with

a toothpick. In a large casserole dish, place the burritos so that they are touching but not packed

too close. Cover with aluminum foil and bake for twenty minutes. Take off the foil and bake for

five to ten more minutes or until the shells turn golden brown. Serve with lettuce, sour cream,

avocado, and salsa.

Image

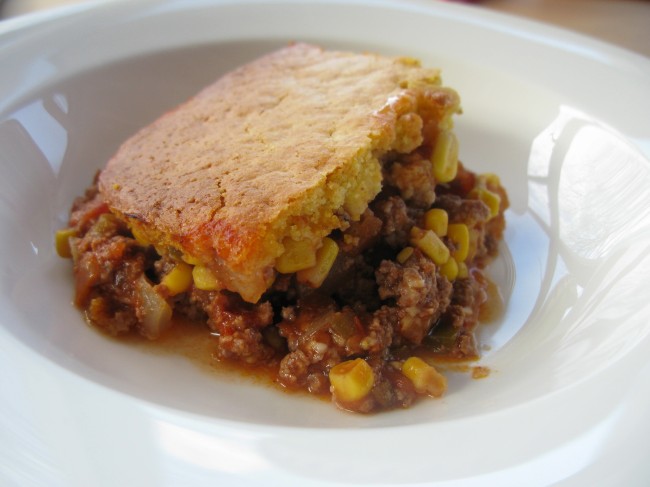
Corn Bread Casserole

This is another great meal for big crowds or hungry teens. This one is a hit and so simple to

throw together. With only a few ingredients you can make this up in minutes and have dinner on

the table. It is also very affordable and filling for those days that you need to stretch the budget.

Feel free to add in more veggies if you would like, but remember that salsa has lots of veggies in

it too!

Ingredients:

2 boxes Jiffy Corn Muffin Mix (2 Eggs and 2/3 cup Milk)

1 can Creamed Corn

1.5 lbs. Ground Beef (or Turkey)

1 cup Diced Onion

½ cup Diced Carrots

1 16 oz jar of Salsa

4 cups Shredded Cheese

Directions:

This tasty casserole makes enough for a crowd! It is very easy to make too. Preheat your oven to

350 degrees. Grease a 9 by 13 casserole dish. Prepare the Jiffy as directed and then stir in the can

of creamed corn. Set aside. Brown the meat, onions and carrots until cooked through. Drain off

grease. Add the jar of salsa and mix well. Pour meat mixture into casserole dish. Sprinkle on half

the cheese. Over that, pour half the Jiffy mix and spread until the meat mixture is well covered.

Sprinkle on the rest of the cheese and then pour on the rest of the Jiffy mix. Spread until Jiffy

mix reaches edges of pan. Bake for 25-35 minutes or until the cornbread is fully cooked.

Image

Mexican Casserole

Also known as Mexican lasagna, this tasty recipe can easily be supplemented by extra veggies

depending on what flavors your family likes. I love it because it is a great one pot meal that

freezes well too. Make a couple of batches of this and freeze one for later. You won’t regret it!

Ingredients:

1 lb. Ground Beef (or Turkey)

1 cup Chopped Onion

2 tbs. Taco Seasoning (Optional)

2 ½ cups Salsa

1 canBlack Beans or Red Kidney Beans(Rinsed and Drained)

¼ cup Italian Salad Dressing

1 can of Whole Kernel Corn (Drained)

¾ cup Sour Cream

6 Small (8 inches) Flour Tortillas

2 cups Shredded Cheese

1 cup Shredded Lettuce

½ cup Chopped Tomato

Directions:

Preheat your oven to 400 degrees. Grease a 9 by 13 casserole dish. In a large skillet brown the

meat and onion until cooked through. Drain off the grease and add the taco seasoning if desired.

Stir in the salsa, beans, corn, sour cream, and dressing until well mixed. Pour 1/3 of the meat

mixture into the casserole dish and spread thin. Take two flour tortillas and tear into bit sized

pieces or leave whole and spread over the meat layer. Sprinkle with 1/3 of the cheese. Repeat

until all layers are complete. Cover and bake for 25 minutes. Serve with lettuce and tomatoes.

These tasty Tex-Mex recipes are sure to become a hit with your family. Why not try out

something new and see how easy it is to have a great meal on the table in minutes!

Author Byline:

Blogging for was a natural progression for Allison once she graduated from college, as it

allowed her to combine her two passions: writing and children. She has enjoyed furthering

her writing career with http://www.nannyclassifieds.com. She can be in touch through e-mail

allison.nannyclassifieds@gmail.com.

———————————————-

Thanks so much Allison! We hope you all enjoy her recipes as much as we did!

~twosaucysisters

Gluten Free Pancake Crash Course

So now that you’ve had this container of gluten-free flour mix sitting in your cupboard for the better part of a month, are you ready to do something with it?

That’s right, after yet another (and even longer) blogging hiatus, we have returned and this time we come bearing gifts…

And by gifts we mean pancakes, of course!

DSCN6387

Because here at Two Saucy Sisters, we believe that thick, fluffy pancakes should be accessible to everyone- including our gluten-free friends! 🙂

DSCN6388

We decided to go with a basic, plain pancake recipe here to allow you guys to have some fun with it and add whatever you want to them.  Chocolate chips, blueberries, cinnamon and raisins, or maybe for the more adventurous you want to try adapting some of our other pancake recipes- how about banana nut? Strawberry Shortcake?  Pumpkin Gingerbread?  Or why not Chocolate-Banana Upside Down pancakes?  Are you drooling yet? 😉

Of course, we couldn’t just have plain pancakes for breakfast (where’s the fun in that?) so, in the spirit of Fall, we topped ours with a little pear-apple concoction!

DSCN6390

Cinnamon, pears, apples, raisins and a splash of maple syrup goes a looong way, people!

DSCN6394

But before you go running to your kitchen to make these, let’s have a little chat about gluten-free baking.  Well, okay, we suppose making pancakes isn’t exactly baking, per se, but it’s close enough, in our opinions!

The main thing to remember when adapting a recipe to use gluten free flour is that different types of flours have different liquid-holding capacities, so always cut back on the liquid by at least a third, then gradually add liquid in until you’ve reached the consistency you want.  Which leads us to rule #2: when using gluten-free flour, your batter should be thicker than when using standard white or whole-wheat flour.  This is especially true for pancakes if you want them to be thick and fluffy, which is obviously what everyone wants in a good pancake!

DSCN6395

Lastly, you will notice that we added a bit of coconut flour to the batter.  This is not entirely necessary (in fact, our first trial didn’t use it) but it really does help make the pancakes thicker and fluffier.  If you`re worried about a coconutty flavour, fear not because the small amount we’ve added doesn’t change the taste one bit!  Coconut flour is also really easy to find (in Canada you can get it at the Bulk Barn).  But if you decide to leave it out, you may want to cut back on the liquid slightly.

Anyways, now that you’ve been given a crash-course on gluten free pancake making, we hope you enjoy our recipe, and have fun adding all sorts of yummy add-ins to them! 🙂

Gluten-Free Basic Pancakes

DSCN6394

Prep Time: 10 minutes
Cook Time: 10 minutes
Serves: 2

Ingredients:

2/3 c. High-fibre gluten-free flour blend
2 tbsp coconut flour
1 tsp baking powder
1/2 tsp baking soda
1 tsp cinnamon

1 egg, beaten
1/2 c. milk of choice (add more if necessary)
1/2 tsp vinegar
1 tbsp maple syrup or honey
1 tsp vanilla extract

Directions:

Pre-heat a non-stick skillet or pancake griddle over medium-high heat.

In a medium-sized bowl, combine all the dry ingredients.  Combine the wet ingredients in a separate, small bowl.  Add the wet ingredients to the dry ingredients and stir until just combined.

Drop spoonfuls of batter onto the pan (we found these worked better if we made them a little smaller).  Once you see bubbles start to form and the edges begin to cook, flip and cook for another 2-3 minutes.  Keep warm while cooking the remaining batter.  Top with fruit, maple syrup, nuts, or whatever else you’d like!  (Our recipe for the apple-pear “sauce” is below!)

Apple-Pear “Sauce”

1 apple, diced
1 pear, diced
1 tbsp corn starch or arrowroot flour
1 tsp cinnamon
3 tbsp raisins
1 tbsp maple syrup
1/4 c. water

Directions:

Add all ingredients except water to a small pot and stir to combine.  Add the water and bring to a boil.  Cook on high for 2-3 minutes, stirring frequently.  Turn the heat to low and simmer, stirring every couple minutes, until the apples and pears are cooked and the sauce has thickened.

~twosaucysisters

Have you ever tried adopting a recipe to be gluten-free?  What was challenging about it?

Did You Miss Us?

Hi everyone- long time no see!

We’re pretty sure this is a record posting hiatus for us.  In fact, we wouldn’t be surprised if you guys all thought we had given up blogging!  But fear not, we have returned.

As you might remember, we had no internet for two weeks, which obviously made posting a little difficult- our wallets couldn’t handle Starbucks trips every day to use their wifi!  But the thing is, even once we had internet we just had no motivation.  We became very busy with classes, practice, and competitions (we had our first race in Montreal this past weekend!) and we were left with absolutely no inspiration.  Nothing we created really seemed “blog-worthy”, and all of our meals were either re-makes or just thrown together quickly.  In short, we were feeling kind of burnt-out.

But we think we’re ready to join the blog world again.  It may be a slow return, so don’t be surprised if we aren’t posting quite as frequently as we usually do, but we will try not to leave you guys hanging for 3 weeks like we did this time!

And so what are we bringing you on our first post after being MIA for 3 weeks?

Flour.

DSCN6347

Yes, flour. What, were you expecting cake? 😉

DSCN6345

Hey, flour is a main ingredient in cake, isn’t it?  You never know- maybe we’ll try making cake with this flour?  Stay tuned!

DSCN6349

So you’re probably wondering why we’re giving you a recipe for flour since it’s generally considered a raw ingredient that you don’t have to make yourself.  And you’re right to be confused but allow us to explain…

DSCN6342

This is our very own all-purpose (high fibre) gluten-free flour blend!  We decided that we want to start doing some more experimenting with gluten-free baking.  Not because we’re switching to a gluten-free diet or anything- we just like a good challenge 😉

We also want to make our blog accessible and beneficial for everyone- including all our gluten-free friends out there!  Not to mention that we have a couple girls on the team who cannot eat gluten, so whenever we bake for the team we’ll be using this flour.

All the flours we used in this blend can be found at the Bulk Barn (or whatever bulk food store you have where you’re from).  It’s high fibre, too, which makes it a great replacement for whole wheat flour!

So make this flour and then let the experimenting begin!

High-Fibre Gluten-Free Flour Blend

DSCN6347

Prep: 5 min
Makes: 4 cups

Ingredients:

2 c. Brown Rice Flour
1 c. Teff Flour
1/2 c. Corn starch
1/2 c. Tapioca flour

Directions:

Combine all flours in an air-tight  container and combine well.  Store in a cook dark place to use in all of your gluten-free baking.

~twosaucysisters

Have you ever tried using gluten-free flour?  What are your favourite flours to use?

Summer’s End

Hi everybody- Long time no see!

Between being away up north in Magnetawan all last week with no access to internet (or showers, we might add…) and moving into our new house in London this week (also with no internet access yet- thank you Starbucks for your free wifi!) we have basically fallen off the face of the planet.  The blog planet, that is!

We have also done hardly any cooking over the past few days (unless you count thawing muffins in the microwave as cooking…) so we are seriously lacking in blog topics and recipes to share with you.  But being that it is the start of the new school year and we are currently feeling rather nostalgic about the summer, this is the perfect time to do a summer recipe recap post!

So, without further ado, we give you our favourite recipes from this summer…

DSCN5852

Blackened Salmon

DSCN5801

Slow-Cooker Pulled Pork

DSCN6286

Zucchini Pesto Noodles with Turkey Meatballs

DSCN6165

Strawberry Asparagus Corn Salad with Chicken

DSCN6204

Quinoa Pesto Tabouleh Salad

DSCN5972

Easy Greek Salad

DSCN6183

Basil-Sage-Arugula-Walnut Pesto

DSCN5891

Tzatziki Hummus

DSCN5936

No-Bake Chocolate Lavender Tart

DSCN6007

Chocolate-Peanut Butter Layer Cake

DSCN6123

Chocolate-Peanut Butter Rice Krispie Freezer Bars

DSCN6248

No-Bake Peanut Butter Banana Granola Bars

DSCN6267

Chocolate Peanut Butter Banana “Ice Cream”

DSCN6329

Peach Crumble Bars

So as you can see, we spent some time doing a little grilling this summer, enjoyed all the delicious fruits and veggies that summer has to offer, and apparently really enjoyed making chocolate-peanut butter-banana everything (which we honestly didn’t realize until writing this post- evidently we’re a little obsessed).

It was a fantastic summer and we’re sad to see it end, but we’re looking forward to a great 4th year here at Western University and another great season with the Mustangs!

Our posting may still be a little sporadic over the next little while as we continue to get settled in, but we’ll try to check back with everyone in a few days!

~twosaucysisters 

Just Peachy!

It’s August in Ontario. Know what that means?

Peach Season!

One of our absolute favourite times of year, especially living in an area that is well known for the peaches that grow here. We even have a festival specifically for them, where they serve the world’s best (yes, we said it) peach sundaes. In fact, the peaches here are so good that we only eat peaches this time of year. To buy some overpriced  picked-way-before-it’s-ripe peach that’s shipped thousands of miles and isn’t even that good of peach would be doing this magnificent fruit such injustice!

No, we will only eat fresh Ontario Peaches. Call us princesses, we don’t care!

We’ve made Peaches and Cream Baked Oatmeal, Fish Fingers with a Peach Dipping Sauce, a Peach Blondie Breakfast Parfait, Peach Pancakes a La Mode, Peach Raspberry Overnight Oats, Peach Salsa, Peach-Tomato Chutney and so much more! But for today’s post, we thought we’d play up the sweeter side of a peach…

DSCN6329So we made Peach Crumble Bars!

DSCN6322

Using an old date square recipe, we came up with a healthy treat that’s not only delicious, but actually stays together!

DSCN6331

Now don’t get us wrong, they are still Peach Crumble bars, meaning the crumb topping can get a little messy. Unlike many date square recipes we come across, however, they are not dry or overly sweet.

DSCN6333

This recipe took more than one trial to get right, and frankly, we’re proud of the results! The first time we made them, they were a little too salty and just a tad on the dry side – neither of which stopped our family from gobbling them up anyways! We knew that with just a couple minor tweaks here and there, they would be perfect!

DSCN6319So go buy yourself some fresh, local peaches and celebrate the season with a peachy treat! 🙂

Peach Crumble Bars

DSCN6329

Prep time: 20-30min
Bake time: 30-35min
Makes: 12 bars

Ingredients:

6 ripe, medium sized peaches
2 tbsp honey

1 1/2 c. whole wheat flour
1/2 c. ground nuts (we used almonds and walnuts)
2 c. oats
1/2 tsp ground cloves
1/2 tsp salt
1/3 c. + 1tbsp honey or maple syrup
1/2 c. + 1 tbsp coconut oil

Directions:

Pre-heat oven to 350 F.
Peel and slice the peaches. Toss with honey and set aside.
In a large bowl, combine all dry ingredients. Melt the coconut oil and combine with honey or maple syrup. Mix into the dry ingredients until there are no dry patches and you have a somewhat crumbly mixture.
Remove 2 cups of the crumble mixture and set aside.
Spread the remaining oat mixture in the bottom of a greased 9X9inch square baking pan. Using the back of a lifter/spatula, press the mixture firmly into the bottom of the pan. Pour the honeyed peaches over the top and spread evenly across the pan. Take the reserved 2 cups of oat mixture and sprinkle it evenly over the top.
Bake for 30-35min, or until the crumb begins to turn a golden brown.

~twosaucysisters

What’s your favourite way to enjoy fresh peaches?

**ps- we will be away all this week at Cross Country Training camp, so we apologize in advance if we do not respond to any comments/questions right away, we will be sure to read them as soon as we return!  Have a great week everybody!

Masters of Disguise

Vegetables are good for you.

Duh

Obviously, one of the best ways to get a nice big helping of veggies is to nice, big salad.  But not everyone loves salad- we get that.  So what are all the non-salad lovers to do?

Disguise their salad in the form of something else…

DSCN6277

Something like pasta!

DSCN6273

Zucchini-noodle pasta, to be precise.  With diced tomatoes and pesto sauce.  And delicious turkey meatballs, of course!

DSCN6276

This is basically summer on a plate, people!  Because if you’re like us, you have a garden bursting with zucchini and tomatoes.  If not, you probably have a neighbour who would be happy to give you some.  At the very least, you most likely have a farmer’s market or grocery store near by that would be practically paying you to take them if they sold them for any cheaper!

DSCN6280

It really is amazing how noodle-like zucchini becomes when you slice it extra-thinly.  Whoever came up with the idea originally (because we are definitely not reinventing the wheel, here!) is a genius, and our hat goes off to him (or her!).

This is also a great dish for people who are trying to cut back on their carb consumption.  Of course, it also tastes really great with a crusty, multigrain loaf of bread on the side, too- which is obviously what we did.  (What can we say?  We are girls who love our carbs!)

DSCN6286

It is also a snap to prepare.  You can make the pesto up to a day or two beforehand if you wish, and you can cook the meatballs while you slice the zucchini.  Once each element is ready, its just a matter of throwing everything together!  Simple as that.

So is it pasta, or is it salad?  You could call it whatever you want- we’re going to call it delicious 😉

Zucchini Pesto Noodles with Turkey Meatballs

DSCN6286

Prep Time: 20 minutes
Cook Time: 10-15 minutes
Serves: 6

Ingredients:

For the Pesto:

1 c. basil leaves
1/2 cup walnuts
2 tbsp lemon juice
1 clove garlic
1/4 tsp salt
1/3 c. olive oil
1 tbsp parmesan or nutritional yeast (optional)

For the Meatballs:

2 lbs lean ground turkey
2 tbsp fresh basil leaves
1/4 tsp salt
2 tbsp onion flakes
black pepper

For the Pasta:

3 large zucchini
3 tomatoes

Directions:

For the Pesto:

Lightly toast the walnuts and set aside to cool.  Mince the garlic and add it to a blender or food processor along with the basil, lemon juice, salt and cheese (if using).  Add the walnuts and begin blending.  When the walnuts have been ground up, start slowly adding the oil, with the motor running, until you have a smooth consistency that is neither too thick nor overly runny.  You may have to stop the motor to scrape down the sides once or twice.  Store in an air-tight container in the fridge until you are ready to use it.

For the Meatballs:

Using your hands, mash up the turkey so that you can form it into clumps that stick together.  Roughly chop the basil leaves and add them to the turkey mixture along with the other ingredients.  Taking about 1.5-2 tbsp of the mixture at a time, form the turkey into small balls.  Heat a large non-stick frying pan over medium heat.  Add the meatballs and cook for about 5 to 7 minutes, turning them so that they brown on all sides.  Place a lid over the pan and cook for another 5-7 minutes, or until they are cooked all the way through.

For the Pasta:

Using a mandolin or a vegetable peeler, slice or peel the zucchini length-wise into wide, very thin strips, stopping when you get to the center where all the seeds are.  Dice the tomatoes into small pieces.  Pour the pesto into the zucchini noodles and toss to coat all the strips evenly.  Place in the fridge until you are ready to serve.

When everything is ready, divide the zucchini evenly among 6 plates.  Top with diced tomatoes and meatballs, and serve.

(You can have the meatballs heated up or served cold, it is up to your own personal preference)

~twosaucysisters

Have you ever tried zucchini noodles?  What creative ways do you like to make sure you’re eating enough vegetables?

Curve Balls and Ice Cream

Sometimes life can throw some serious curve balls at you.

One minute, you think you’ve got it all together.  You’re certain of yourself- you’re confident, happy.  You’ve got plenty of friends and family and everything is smooth sailing.

Then one small change can throw you right off.  All of a sudden you’re left questioning whether what you thought all along was real.  Something you thought was one thing seems to be something else entirely.  You start wondering if this entire time you were in the middle of some big joke that no one let you in on.

Yeah, sometimes life gives you not-so-pleasant and unexpected surprises.

And then sometimes it gives you ice cream.

DSCN6261

But here’s what we’re not going to do: We’re not going to tell you that this “ice cream” is as rich and decadent as a bowlful of Haagen Dazs or Ben and Jerry’s.  Sorry everyone, but that kind of sinful deliciousness cannot be achieved without the addition of cream and sugar, which doesn’t really work with the whole healthy food blog thing…

DSCN6263

However, we will tell you what it does have:  Banana, chocolate and peanut butter.  Some of you may think we’ve over-done that flavour combo over here, but we can’t disagree more!  You can never have too much peanut butter-chocolate-banana.  You just can’t.

DSCN6264

So although this may not be as indulgent as regular ice cream, this stuff makes for a pretty delicious, simple and healthy summer snack or dessert.  And that’s the honest truth.

DSCN6267

Because you know what?  Sometimes things happen that you wish hadn’t, and sometimes people disappoint you- but chocolate, peanut butter and banana will not.  So enjoy, friends!

Chocolate Peanut Butter Banana “Ice Cream”

DSCN6261

Prep: 10 minutes
Chill: 2-3 hours (optional)
Serves: 3-4 people

Ingredients:

4 ripe bananas
1/4 c. peanut butter
2 tbsp cocoa powder
1 tbsp milk
pinch of salt

Directions:

Peel the bananas and place on a tray lined with wax paper.  Place in the freezer and chill for 2-3 hours, or until the bananas are frozen or almost frozen. (We recommend doing this with a whole bunch of bananas and then just keeping the frozen bananas in your freezer all the time to use whenever you’d like)

Slice the bananas and place them in a food processor along with all other ingredients.  Blend on high speed until the mixture becomes smooth and creamy, scraping down the sides as necessary.

You can eat it right away as soft serve, or you can pour the mixture into an air-tight container and freeze for 2-3 hours for a more “hard-scoop” kind of ice cream.

~twosaucysisters

No-Bake No-Problem

So, we’re about to open another post talking about the weather.  We hate to be repetitive or predictable, but really, the weather has so much of an effect on what we eat that it really must be mentioned!  At least in this post, anyways.

Because today we’re talking about these:

DSCN6247

No-bake peanut butter banana granola bars!

DSCN6230

You see, we try to always have quick snacks in the house that we can toss into our lunch bags when we go to work.  Lately, though, we’ve been on a huge muffin-kick.  Remember these?  So what do muffins have to do with the weather?  Nothing.  Except that they require an oven…

DSCN6245

And you might recall us mentioning a couple times the heat-wave we experienced a few weeks ago.  Definitely not muffin-baking weather.  Which is where these granola bars come in.

DSCN6249

Our first attempt at these granola bars was made during said heat-wave.  Unfortunately, while they tasted really good, they fell apart very easily and so we knew we needed to give them another try before we gave the recipe to you guys.

DSCN6251

But then the heat wave came to a very abrupt end (as in the temperature literally dropped by about 20 degrees Celsius overnight), and suddenly not using the oven wasn’t such a priority.  But we had already made one attempt, and we knew we couldn’t back down from the challenge!

DSCN6242

On the second attempt, the stars aligned and they turned out just the way we wanted!  Don’t you love it when that happens?

DSCN6240

Confession:  The first time we made these they had chocolate chips in them.  The second time around we went to put chocolate in them again and realized we were all out- yes, it was a shock to us too- so these ones are chocolate-free.  But adding chocolate chips is highly recommended.

DSCN6248

So we’ve put muffin-mania on hold for a few days, because right now we’re all about the no-bake granola bars!  Our oven could use a little vacation, anyways 😉

No-Bake Peanut Butter Banana Granola Bars

DSCN6247

Prep Time: 15 minutes
Chill Time: 2 hours
Makes: 12 bars

Ingredients:

3 cups rolled oats, divided
2 tbsp chia seeds (or ground flax seed*)
1/4 tsp salt
1/2 c. chopped peanuts
1 ripe banana, mashed
1.2 c. peanut butter (we used all-natural)
1/4 c. honey
1 tsp vanilla extract
1/4-1/2 c. chocolate chips, optional

Directions:

Grind one cup of the oats in a blender or food processor until it is a fine flour.  In a large bowl, combine the ground oats with the remaining 2 cups of whole oats, chia seeds, salt and chopped peanuts.

In a separate bowl combine the mashed banana, peanut butter, honey and vanilla and stir until it is smooth and fully mixed.  Pour the peanut butter banana mixture into the dry ingredients and stir until no dry spots remain.  You may add the chocolate chips at this point if you are using them.

Line a 9×9 inch square glass dish with wax paper.  Press the mixture firmly into the bottom of the dish and set in the refrigerator for about 2 hours to firm up.  When they are ready, use the edge of the wax paper to gently lift the un-cut bars out of the dish.  Cut into 12 bars and store in an air-tight container in the fridge.

*You can use ground flax seed in place of chia seeds, however we have not personally tried this and cannot guarantee the bars will stay together as well.  If you decide to give this a try, please let us know how they turn out!

~twosaucysisters

What are your favourite no-bake treats?  Have you ever tried making no-bake granola bars?